Introduction and Key Insights
If you’re searching for a healthier twist on the classic dessert, look no further than this delightful Greek Yogurt Cheesecake. Rich in flavor yet light in calories, this cheesecake offers a creamy texture that will satisfy your sweet cravings without the guilt. Made primarily with Greek yogurt instead of traditional cream cheese, it provides a protein boost while maintaining that indulgent taste we all love. The unique tanginess of the yogurt elevates the flavor profile, making it an exquisite addition to your dessert repertoire.
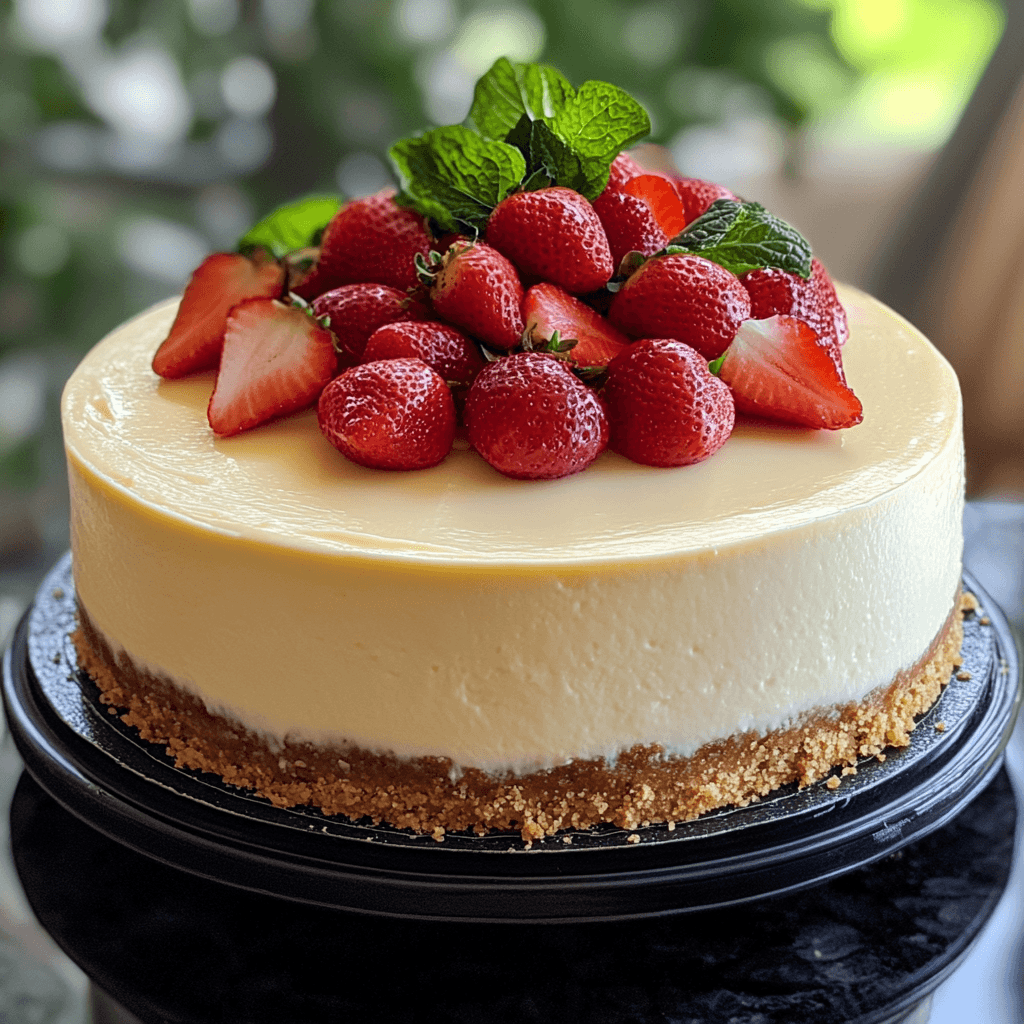
In this article, we’ll walk you through every step of crafting the perfect Greek Yogurt Cheesecake. From gathering the ingredients to mastering each technique, you’ll gain valuable insights that will make your baking experience enjoyable and successful. This is not just another recipe; it’s an invitation to create something truly special for family gatherings or quiet evenings at home.
Whether you’re aiming for a show-stopping centerpiece or simply want to indulge in something sweet after dinner, this cheesecake is versatile enough to fit any occasion. Join us as we dive into the ingredient overview next, where we’ll break down everything you need to make this mouthwatering dessert.
Ingredients Overview for Greek Yogurt Cheesecake
Crust Ingredients
The base of our Greek Yogurt Cheesecake is a simple yet flavorful crust made from graham crackers. You will need 1 ½ cups of crushed graham cracker crumbs and ½ cup of melted unsalted butter. The combination creates a buttery layer that perfectly balances the creamy filling above.
Filling Ingredients
For the filling, you’ll need 2 cups of plain Greek yogurt (preferably full-fat for creaminess), ¾ cup granulated sugar, 3 large eggs, and 1 teaspoon of vanilla extract. The yogurt serves as the star ingredient here, providing both texture and tanginess.
Topping Ingredients
To finish off your cheesecake beautifully, consider fresh fruit toppings like berries or sliced peaches. Additionally, having some whipped cream on hand can enhance presentation and flavor. Use about 1 cup of mixed berries and ½ cup of whipped cream to achieve that lovely look.
Optional Flavoring Ingredients
For those who wish to experiment further with flavors, consider adding lemon zest (from 1 lemon) or cocoa powder (about ¼ cup) if you want a chocolate variation. These ingredients can elevate your cheesecake to new heights.

How to Prepare Greek Yogurt Cheesecake
Step 1: Prepare the Crust
Begin by preheating your oven to 350°F (175°C). In a mixing bowl, combine the crushed graham cracker crumbs with melted butter until well combined. Press this mixture firmly into the bottom of a springform pan using your fingers or the back of a measuring cup. Make sure it’s packed evenly to create a sturdy base for your cheesecake.
Once your crust is ready, place it in the preheated oven and bake for about 8-10 minutes until it’s lightly golden brown and fragrant. Keep an eye on it during baking; you want it crisp but not overdone. After removing it from the oven, allow it to cool completely while you prepare your filling.
Step 2: Make the Filling
In another large mixing bowl, combine the plain Greek yogurt with granulated sugar using an electric mixer on medium speed until smooth and well blended. This process should take about two minutes—don’t rush it. Next, add in one egg at a time while mixing on low speed just until incorporated; avoid overmixing as this could lead to cracks during baking.
Once all eggs are added and fully incorporated into your mixture, stir in vanilla extract along with any optional flavorings like lemon zest if desired. Your filling should be thick yet pourable at this stage—scrape down sides as needed for thorough blending.
Step 3: Combine Layers and Bake
With both crust and filling prepared separately now comes time for assembly. Pour your creamy filling mixture over the cooled crust carefully so as not to disturb it too much—using a spatula helps spread evenly across the surface if necessary.
Place in oven again but this time reduce temperature slightly down to around 325°F (160°C). Bake for approximately 50-60 minutes until edges appear set but center remains slightly jiggly—it will firm up as it cools. Turn off heat after baking time ends; crack open oven door slightly allowing gradual cooling which helps prevent cracks forming on top surface.
Step 4: Chill Before Serving
Once cooled sufficiently at room temperature (usually takes about an hour), transfer cake directly into refrigerator covered lightly with plastic wrap or foil—chill overnight ideally allowing flavors meld beautifully together prior serving day arrives. This step enhances texture making slice easier later too. When ready enjoy slices fresh topped generously with preferred fruits/whipped cream.

Serving and Storing Tips
Serving Suggestions
When it’s finally time to serve your delicious Greek Yogurt Cheesecake, consider presenting each slice on individual plates garnished with fresh berries or drizzled honey for added sweetness. For extra flair sprinkle some crushed pistachios atop each piece before serving; they pair wonderfully against contrasting colors visually appealing guests greatly.
If hosting gatherings remember guests may appreciate different topping options available nearby such as chocolate sauce or whipped cream too—putting them right beside cake makes serving easy without fussing later.
Storing Leftovers
If you have leftovers (which is rare.), store them properly by covering tightly with plastic wrap placed inside airtight container ensuring maximum freshness retained longer duration possible. Typically stored correctly keeps well around five days refrigerated enjoying best quality during first few days right after preparing—but who can resist indulging straight away anyway?
Freezing leftovers also works nicely if needed; simply slice pieces individually then wrap securely before placing into freezer bags/containers labeled clearly date-wise kept frozen up four months easily reheating later when craving strikes again.
By following these comprehensive instructions alongside sensible serving/storage tips you’ll create delectable moments enjoyed while savoring each bite from delightful homemade treat created love dedicated effort put forth every step along way.
Mistakes to avoid
One common mistake when making Greek Yogurt Cheesecake is using low-quality yogurt. The flavor and texture of your cheesecake rely heavily on the yogurt you choose. Always opt for full-fat Greek yogurt that is thick and creamy. Low-fat or non-fat varieties can lead to a runny consistency and affect the overall richness of the cheesecake. Additionally, check for additives in the yogurt. Pure, high-quality Greek yogurt will enhance your dessert’s taste.
Another mistake is not allowing your ingredients to reach room temperature before mixing. Cold ingredients can lead to a lumpy batter, which ruins the smooth texture you desire in a cheesecake. Take your Greek yogurt, eggs, and cream cheese out of the refrigerator about 30 minutes before you begin preparing your cheesecake. This simple step ensures a uniform mixture and helps achieve a silky-smooth filling.
Overmixing your batter is another critical error. While you want to combine all ingredients thoroughly, overmixing introduces excess air into the batter, causing it to rise too much during baking. This leads to cracks and an uneven surface once cooled. Mix just until combined, ensuring you scrape down the sides of your mixing bowl without going overboard.
Failing to preheat your oven properly can also ruin your cheesecake. An oven that isn’t hot enough can lead to uneven baking and a potentially soggy crust. Use an oven thermometer if necessary to ensure it reaches the correct temperature before placing your cheesecake inside. Consistent heat is vital for achieving that perfect set and delicious texture.
Finally, don’t skip the chilling time after baking. Many home bakers underestimate how crucial this step is for achieving the perfect Greek Yogurt Cheesecake. Allow your cheesecake to cool gradually at room temperature before transferring it to the fridge. This process helps settle the flavors and improves texture, resulting in a dessert that’s creamy and delightful.

Tips and tricks
To create a flawless Greek Yogurt Cheesecake, consider using a water bath during baking. A water bath helps maintain even temperature around your cheesecake, preventing it from cracking as it bakes. Wrap your springform pan tightly with aluminum foil to prevent water from seeping in, then place it in a larger pan filled with hot water before putting everything in the oven.
Using a quality graham cracker crust can enhance your cheesecake experience significantly. Instead of store-bought crusts, make your own by crushing graham crackers mixed with melted butter and sugar. Press this mixture firmly into the bottom of your springform pan for a sturdy base that holds up well against the creamy filling.
Incorporate flavorings into your Greek Yogurt Cheesecake for an extra layer of depth. Lemon zest or vanilla extract adds brightness without overwhelming the tangy taste of Greek yogurt. You can also experiment with different extracts like almond or coconut for unique variations that elevate your dessert beyond traditional recipes.
Pay attention to baking times—overbaking can lead to dryness while underbaking might give you a gooey center. The ideal outcome is a slightly jiggly center when removed from the oven; it will continue cooking as it cools down. Keep an eye on it during the last few minutes of baking and use visual cues instead of relying solely on timers.
Lastly, don’t forget about presentation. A well-decorated cheesecake not only looks appealing but also enhances dining pleasure. Top with fresh fruit like berries or sprinkle some crushed nuts for added texture and color contrast. Drizzling honey or chocolate sauce can also add aesthetic appeal while complementing flavors beautifully.
Suggestions for Greek Yogurt Cheesecake
For those looking to make their Greek Yogurt Cheesecake even healthier, consider substituting some ingredients without sacrificing taste or texture. For instance, using honey or maple syrup instead of granulated sugar adds natural sweetness while providing additional nutrients compared to refined sugars.
If you’re aiming for a gluten-free version of this dessert, try using almond flour or gluten-free graham crackers for the crust instead of traditional options. These substitutions maintain flavor while catering to dietary restrictions without compromising on quality.
Experimenting with toppings can take your cheesecake from ordinary to extraordinary. Fresh fruits are always an excellent choice; berries like strawberries or blueberries provide both sweetness and tartness that balances well with rich flavors in your cheesecake.
For added richness without extra calories, consider mixing in some pureed fruits such as mangoes or avocados into the filling itself. Both fruits blend seamlessly into the batter while adding nutrition; plus, they impart unique flavors that elevate this classic dessert further.
Create mini versions by using muffin tins instead of springform pans. These individual servings are perfect for parties or gatherings where guests appreciate bite-sized treats that still deliver all those delicious elements found in traditional cheesecakes.

FAQs
What makes Greek Yogurt Cheesecake different from regular cheesecake?
Greek Yogurt Cheesecake stands out due primarily to its unique ingredient—Greek yogurt—which replaces some traditional cream cheese found in regular cheesecakes. This substitution results in lower fat content yet maintains creamy consistency thanks partly because it’s thicker than standard yogurts available today. Additionally, using Greek yogurt imparts a tangy flavor profile that’s distinctively refreshing compared against sweeter counterparts traditionally seen within desserts like custards or puddings.
Can I use non-fat Greek yogurt for my cheesecake?
While non-fat Greek yogurt can technically be used in recipes calling explicitly upon them, keep in mind its potential impact on both texture & flavor profiles overall outcome may differ considerably compared against full-fat varieties known best suited creating rich indulgent desserts such as cheesecakes. Non-fat options often yield drier results since they lack sufficient fat content necessary achieving desired creaminess essential within every perfect slice.
How long should I chill my Greek Yogurt Cheesecake after baking?
Chilling time varies depending upon specific recipes followed; however general rule suggests allowing at least 4 hours minimum refrigeration period post-baking until fully set before serving. Overnight chilling allows flavors meld better together develops richer complexity overall enhancing each bite enjoyed afterward tremendously.
Can I freeze my leftover Greek Yogurt Cheesecake?
Yes., freezing leftovers is possible provided done correctly. Wrap slices tightly using plastic wrap followed by aluminum foil preventing freezer burn preserving freshness lasting several months if stored properly—thaw overnight within refrigerator prior consuming again enjoying delightful treat once more.
Is there an alternative sweetener I can use?
Absolutely. Several alternative sweeteners exist catering various dietary preferences including stevia erythritol coconut sugar among others offering low-calorie options without sacrificing sweetness enjoyed throughout recipes created featuring delicious desserts such as these cheesecakes.
How do I know when my cheesecake is done baking?
Determining doneness requires keen observation; look specifically towards edges appearing set whilst center remains slightly jiggly upon removing from oven indicating perfectly baked state achieved—it’ll continue cooking outside residual heat ensuring proper setting occurs gradually leading toward final product enjoyed later.
Conclusion
In summary, mastering the art of making Greek Yogurt Cheesecake involves being aware of common mistakes while implementing effective tips and tricks along the way. Choosing high-quality ingredients plays an essential role; thus selecting full-fat Greek yogurt significantly enhances taste and texture compared against lower-fat alternatives found elsewhere. Techniques like utilizing water baths help ensure even baking preventing unsightly cracks from forming during process too.
Don’t forget about creativity—experimenting with flavors through natural sweeteners & thoughtful toppings elevates every bite experienced allowing personalization tailored towards individual preferences while maintaining nutritious aspects overall dish prepared successfully achieved within kitchens across globe today. Lastly always remember importance chilling time must never be overlooked since patience ultimately rewards us deliciously satisfying outcomes enjoyed by many alike gathered together sharing moments filled joy laughter savored through delightful bites taken throughout gatherings cherished forevermore.
Print
Greek Yogurt Cheesecake
5 Stars 4 Stars 3 Stars 2 Stars 1 Star
No reviews
- Author: Clara Rosewood
- Total Time: 5 hours 20 minutes
- Yield: 8 servings 1x
- Diet: Vegetarian
Description
Greek Yogurt Cheesecake is a creamy and tangy dessert with a rich, smooth texture. This lighter twist on traditional cheesecake uses Greek yogurt for a boost of protein and a velvety finish. Perfect for any occasion, it pairs beautifully with fresh fruit or a drizzle of honey.
Ingredients
For the Crust:
- 1 1/2 cups graham cracker crumbs
- 1/4 cup granulated sugar
- 1/3 cup unsalted butter, melted
For the Cheesecake Filling:
- 16 oz (2 cups) cream cheese, softened
- 1 cup plain Greek yogurt
- 3/4 cup granulated sugar
- 1 teaspoon vanilla extract
- 3 large eggs
- 1 tablespoon cornstarch or all-purpose flour
Optional Toppings:
- Fresh berries
- Honey or fruit syrup
- Whipped cream
Instructions
- Preheat the Oven:
- Preheat your oven to 325°F (165°C). Grease a 9-inch springform pan or line the bottom with parchment paper.
- Prepare the Crust:
- In a medium bowl, mix the graham cracker crumbs, sugar, and melted butter until combined.
- Press the mixture firmly into the bottom of the springform pan. Use the back of a spoon or a flat-bottomed glass to smooth it out.
- Bake for 8–10 minutes, then set aside to cool.
- Make the Filling:
- In a large mixing bowl, beat the cream cheese and sugar until smooth and creamy.
- Add the Greek yogurt and vanilla extract, mixing until combined.
- Beat in the eggs, one at a time, until just incorporated.
- Sprinkle in the cornstarch or flour, and mix until the filling is smooth and lump-free.
- Assemble the Cheesecake:
- Pour the filling over the prepared crust, smoothing the top with a spatula.
- Place the pan on a baking sheet to catch any drips.
- Bake the Cheesecake:
- Bake for 50–60 minutes, or until the center is set but still slightly jiggly.
- Turn off the oven and crack the door open slightly, allowing the cheesecake to cool in the oven for 1 hour to prevent cracking.
- Chill and Serve:
- Transfer the cheesecake to the refrigerator and chill for at least 4 hours, preferably overnight.
- Before serving, garnish with your favorite toppings.
Notes
- For a gluten-free option, use gluten-free graham crackers.
- To enhance the flavor, add a teaspoon of lemon zest to the filling.
- Store leftovers in an airtight container in the refrigerator for up to 5 days.
- Prep Time: 20 minutes
- Cook Time: 4 hours
- Category: Dessert
- Method: Baking
- Cuisine: American

 Brown Sugar and Coconut Body Scrub Exfoliates

 Get The Product!